T56 6 Speed Conversion for 82-92 F-bodies
You might have blown up your 700R4 or T5 transmission, and now want to bolt in something much stronger. You can use a race prepared 700R4 transmission, but what fun is that? Shifting through 6 speeds is where it's at, whether for road racing, or fun on the street. The Richmond 6 speed is pretty nice, but at over $2000, its too expensive for most of us. The Tremec TKO is another bolt in alternative, but why have 5 speeds when you can have 6 for the same price? Besides, the T56 can officially withstand more torque (around 425-450 ft-lbs).
The T56 transmission from a '93 to '97 f-body is almost a bolt in modification. This page should answer most of your questions. When you go to a junkyard to get your donor parts, you will need to get almost everything from your donor car. About the only thing you can reuse is the rubber transmission mount and torque arm mount. Everything (and I mean everything!) has to come from the donor car. If you can get a 94 or newer transmission, it has a wider gear ratio (with a .5 overdrive) so you can run 4.11's and still get great highway mileage.
Speedometer Calibration
If you have a 90+ Camaro or an 87+ Firebird you already have an electronically driven speedometer. If not, the transmission's electronic signal has to get converted to a mechanical shaft drive, or the speedometer must be changed to an electrical unit. JTR (Jag's That Run) has a conversion kit available to change the electrical T56 output to a mechanical cable, but unfortunately, it is around $300. Abbot makes a black box that drives a cable speedometer as well, for a few hundred. Auto Meter has an electronically driven speedometer that accept's the VSS signal. I'm using this, along with a few others very succesfully.
The f-body T56 has a 17 pulse per driveshaft revolution VSS signal generator in the tailshaft. This has to get converted to a 4000 (or 2000) pulse per mile signal for your VSS buffer input. The easiest way is to purchase the Dakota Digital SGI-5 signal recalibration box to do this. This is just spliced in between the transmission and chassis wiring. I also
put together an Excel spreadsheet to calculate the VSS divisor ratio if you are so inclined.Automatic Transmission Specifics
There isn't much additional work if you have an automatic transmission originally. The obvious is that you'll need to hang the clutch pedal and cut a hole in the transmission tunnel for the shifter. The clutch pedal can be gotten from any 1984-1997 Camaro/Firebird. You'll also need to mount the master cylinder on the firewall. This is one larger hole for the master cylinder, and two smaller holes for the bracket. GM might have even dimpled the firewall in that location to make things easier.
The other difference involves the wiring. You (automatic owners) have a wire going to the shifter for park/neutral. A manual transmission car does not have this, but instead has the clutch anticipate switch, below the clutch pedal. This prevents the car from starting without pressing down the clutch. It should be just moving wires from one to the other, but please refer to the wiring schematics in your service manual. There are differences in the computer chip, and many people have changed to a T5 chip (AXXD chip from a '92 305) and modified the fuel tables for the specific engine. People have also run with the factory automatic chip as well, but some of the transitional tuning usually needs a bit of adjustment (Idle Air Control, Decel, Shifting). That about sums up the differences!
Finding Parts and Prices
As 4th gen f-bodies become more plentiful in junkyards, the prices steadily decline. Expect to pay around $750 (I've seen them from $500 to over $1000) for a used T56 transmission bare, or $1250 ($700-$1700 range) for the complete package (with the flywheel, clutch, shifter, all bolts, etc.) Make sure whoever you purchase it from will give you a guarantee. I've had to return one in the past for worn bearings. The cheapest way to find one is to call your local junkyard and hope they don't realize the going rate for the T56. The other alternative is to either purchase a new one for $2100, or get one from an f-body junkyard which is more expensive for the convenience. You could always post a message on one of the f-body message boards or classifieds as well. Other than this, I don't have advice on where to find one.
Differences between the '93-'97 f-body, 98+ f-body, and Aftermarket T56
1993 to 1997 LT1 F-body T56
Same length as T5 and 700R4, so you can re-use your same 27 spline driveshaft, torque arm, and bushings
Electric 17 pulse per driveshaft rotation VSS (Vehicle Speed Sensor)
LT1 pull-style clutch, bellhousing, and slave cylinder is necessary
1998+ LS1 F-body T56
This is from the LS1 f-body, so it has a different length input shaft, and a completely different push-style clutch
setup. The throwout bearing is a hydraulic unit that eliminates the clutch fork. To change this transmission to work
with the LT1 clutch and bellhousing, you will need to replace the input shaft as well as the front cover of the
transmission case (because it does not have the clutch fork pivot). An LS1 master cylinder might be necessary. The case
and tailhousing dimensions are identical to the LT1 T56.
Retrofit T56
The major benefit to the Retrofit T56 is that it allows you to use a standard style clutch and bellhousing. It also
has a mechanical speedometer sender which is similar to the 700R4 & T5 transmission (an electric 700R4 & T5 VSS will
bolt right in). The draw backs are that the transmission is 1.9" longer, so the driveshaft and torque arm must be
shortened. It is available new from Tom Sallee at Sallee
Chevrolet for $2295.
The following instructions are specifically for an 89 5 speed IROC, but I'll attempt to make them for all third generation f-bodies.
Parts Needed
Instructions
For now, I will assume you can remove your transmission, clutch, and slave cylinder/master cylinder assembly. Go out and get the Helms Service Manual for $75. It will make everything much easier, and ha s directions for it. This web page is for swapping in a 6 speed, and not for those not mechanically inclined.
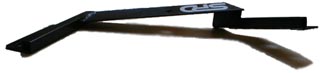
At first, I welded tabs to the frame rails and made a crossmember with a 1/4" thick piece of steel. The crossmember bolted to the tabs with various length bolts and washers as spacers. This design was terrible, since it was very flexible. I could see t he shifter bounce up and down a few times after a bump…
The second design was made to fix the initial shortcomings. I wanted something that would bolt right up to the stock bolt locations, and didn't require welding for the end user. This crossmember is available through SPD for $149, and is powdercoated gloss black, ready to bolt in. The crossmember is fabricated using 1/8" thick steel plate and channels. The plates are drilled to accept the stock locations, and cut to size. A channel is centered on the transmission mount bolt, and joins the two sides. Since the frame rails aren't symmetrical and are angled as well, we needed to get creative in joining the three plates together. Using the square tubing, angle iron, and plates, we tack welded the individual pieces together underneath the car. There was a lot of trial and error involved in fitting the parts precisely together. Once the crossmember was tacked together, it was unbolted, and welded on the workbench. We initially used a MIG welder with an Ar/CO2 mix. This gave us a perfect weld, which looks clean, has good penetration, and didn't distort the pieces. The final test came when we bolted everything up. It fit perfectly.
The current crossmembers are now TIG welded, which makes stronger welds and a nicer appearance. This new design has been engineered to provide extra rigidity without unnecessary weight. We sandblast them, and have the crossmembers powdercoated gloss black. Slap on the SPD decals, and off they go to UPS!
A third option is to take the factory crossmember and cut it into three sections. Bolt the two outer sections to the frame and the middle section to the transmission. Connect all three pieces with the angle iron. It should be s trong enough to work, and is better than my first design (which never broke, and still let me chirp gears…)
Notice that first gear isn’t as powerful (you have to get at least 3.43's to enjoy this transmission). Also notice that you are now cruising at 80 mph and 1600 rpms. Have fun knowing you now have a third gen with a 6 speed transmission.
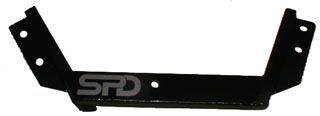
SPD's T56 crossmember comes complete and ready to bolt in. It is constructed with .125" thick steel, and TIG welded together. After sandblasting, the crossmember is powdercoated gloss black.
Clarification - For those using the T56 from a '93-'97 LT1 Camaro/Firebird, choose "OEM T56xmem". For those using the special GM retrofit T56, with mechanical speedo and old-style clutch and adapter plate, please choose "Retrofit T56xmem". Please contact us if you have any questions. Thanks!Application |
Part Number |
Price |
Shipping |
|---|---|---|---|
| 82-92 Camaro/Firebird | OEM T56xmem | $149.00 | $10.25 |
| 82-92 Camaro/Firebird | Retrofit T56xmem | $149.00 | $10.25 |
| 67-70 1st Gen Camaro/Firebird | Under Development | ||
| 67-70 1st Gen Camaro/Firebird | Under Development |